Monitor Light Bars for Small Home Offices: Check Monitor Fit, Webcam Clearance, and USB Power Before You Buy
A monitor light bar can free up desk surface because the light sits on the monitor instead of using a lamp base. That can be useful on a small desk, but the buying decision is not as simple as choosing a bar that looks narrow enough for the screen.
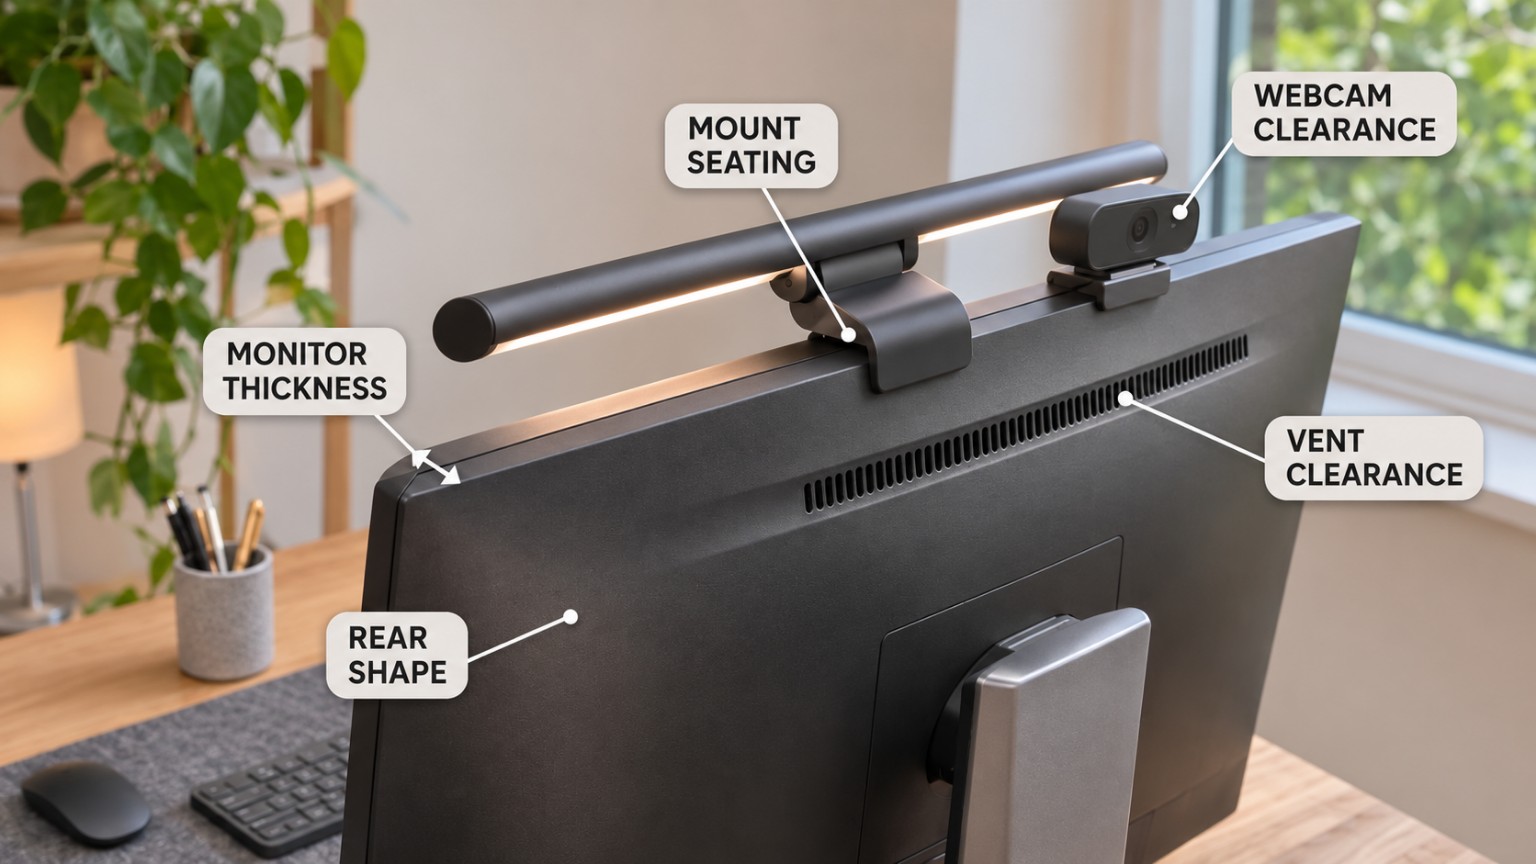
The light bar still has to fit the monitor itself. Its mount has to work with the monitor thickness, curvature, and rear shape. It cannot interfere with a webcam or block a vent. The USB power path has to reach a suitable source without creating an awkward cable run. And the light has to cover the keyboard, documents, and working area you actually use.
That is the Fit-First rule for this guide:
Monitor thickness fit does not prove back-shape fit. Back-shape fit does not prove webcam or vent clearance. Physical installation does not prove that the USB cable or working light coverage will suit your desk.
This guide compares two examples without ranking them:
- BenQ ScreenBar Pro, model 9H.W4KWT.WC6
- Quntis Focus 51cm Pro+, model F51BK, secondary ID LI-HY-0208-BK
Renternook did not physically test these products for this guide. The product-specific statements below are limited to the documentation reviewed for this guide. Where a value is unknown or published sources conflict, that uncertainty stays visible instead of being filled by inference.
The small-home-office decision starts with the monitor
A monitor light bar removes a lamp base from the desktop, but it shifts the fit problem upward onto the monitor.
Before comparing features, check the system in this order:
- Monitor thickness
- Monitor curvature and rear shape
- Top-edge geometry and mount seating
- Webcam clearance
- Vent and sensor clearance
- USB power source
- Cable routing
- Actual keyboard, document, and desk coverage
If any one of those checks fails, the light bar can be a poor fit even when the published monitor-thickness range looks acceptable.
Quick comparison: two different monitor-light-bar decision roles
| Product | Published size / bar length | Published monitor-thickness information | Power | Controls / notable documented feature | Important unknown or caution |
|---|---|---|---|---|---|
| BenQ ScreenBar Pro 9H.W4KWT.WC6 | 50 cm bar; 50 × 13.5 × 9.2 cm published overall dimensions | 0.17–2.56 in | USB-C, 5V, maximum 8.5W | Ultrasonic presence sensor; 2700–6500K | Thickness alone does not prove fit with the exact curvature, rear housing, webcam, vents, or cable path |
| Quntis Focus 51cm Pro+ F51BK / LI-HY-0208-BK | 51 cm bar; installed envelope not established in the reviewed documentation | Source conflict: product-page range 0.12–2.36 in; manual states a larger maximum of 3.94 in. This guide uses 2.36 in as the conservative cap. | USB-C, 5V/1A | Remote control; 2-hour timer; 3000–6500K | Installed envelope, product weight, and remote battery details remain unknown |
The table is not a ranking. The useful question is which product-specific information helps you verify your exact setup, and which fields still require a real-world check before buying.
1. Measure monitor thickness where the mount actually sits
The first gate is the monitor’s top edge where the light bar mount will contact it.
Do not measure the thickest part of the monitor and assume that answers the question. Do not measure a decorative edge that the mount will never touch. Measure the actual installation zone.
The published ranges documented for this guide are:
- BenQ ScreenBar Pro 9H.W4KWT.WC6: 0.17–2.56 in
- Quntis Focus 51cm Pro+ F51BK: use 0.12–2.36 in as the conservative published fit range for this guide
The Quntis value needs an explicit caution. The available sources conflict: the product-page material gives a 0.12–2.36 in range, while the manual states a maximum of 3.94 in. This guide does not silently merge those claims. For a conservative buying screen, use 2.36 in and verify the current exact-model documentation before purchase.
Even when your measured thickness falls inside a published range, the fit is not proven yet.
2. Check curvature and rear housing shape
Two monitors can have the same nominal thickness and still present very different mounting surfaces.
Check whether the monitor has:
- a curved panel;
- a rear housing that bulges near the top edge;
- a stepped or angled back;
- a raised center section;
- a thin top edge that becomes much thicker immediately below it;
- or decorative trim that changes how the mount can seat.
Published thickness compatibility should be treated as one dimension of fit, not a universal monitor-compatibility guarantee.
If the mount cannot seat as intended against the exact front and rear geometry of your monitor, a thickness number by itself is not enough.
3. Check the top edge before adding a webcam
A small home office often uses the same monitor edge for more than one accessory.
A webcam may already sit at the center of the display. A monitor light bar also wants access to the top edge. That creates a physical interference question.
Before buying, look at the exact position where you want each device to sit and ask:
- Does the light-bar mount occupy the same center zone as the webcam?
- Can the webcam be repositioned without blocking the screen or changing the camera angle too much?
- Does either device need rear clearance that competes with the other?
- Will a cable from the webcam collide with the light-bar mount or its power cable?
This guide does not claim universal webcam compatibility for either product. Webcam fit is a setup-specific clearance check.
4. Do not cover vents, sensors, or controls
The top and rear edges of a monitor may include ventilation openings, controls, sensors, or structural details that should remain unobstructed.
Before installing any monitor-mounted accessory:
- inspect the top and rear housing;
- identify any vent openings or manufacturer-defined clearance areas;
- check where the light-bar mount contacts the monitor;
- confirm that the mounted bar does not cover a control, sensor, or vent;
- follow the monitor manufacturer’s instructions for ventilation and accessory placement.
A mount fitting physically does not establish that every contact point is appropriate for every monitor design.
5. Plan USB power before you plan the cable
Monitor light bars still need power, and on a small desk the power path can matter almost as much as the mount.
The documented power information is:
- BenQ ScreenBar Pro: USB-C, 5V, maximum 8.5W
- Quntis Focus 51cm Pro+: USB-C, 5V/1A
That information tells you what the product expects. It does not prove that every USB port on every monitor, dock, hub, or charger is suitable.
Check the intended power source directly. If you plan to power the bar from the monitor, verify the monitor port’s output. If you plan to use a hub, dock, or charger, verify that device instead. Do not assume a connector shape alone proves the required output.
6. Treat cable routing as part of the installed footprint
One reason renters and small-space users consider a monitor light bar is to reduce desk clutter. A poor cable route can give some of that space back in a different form.
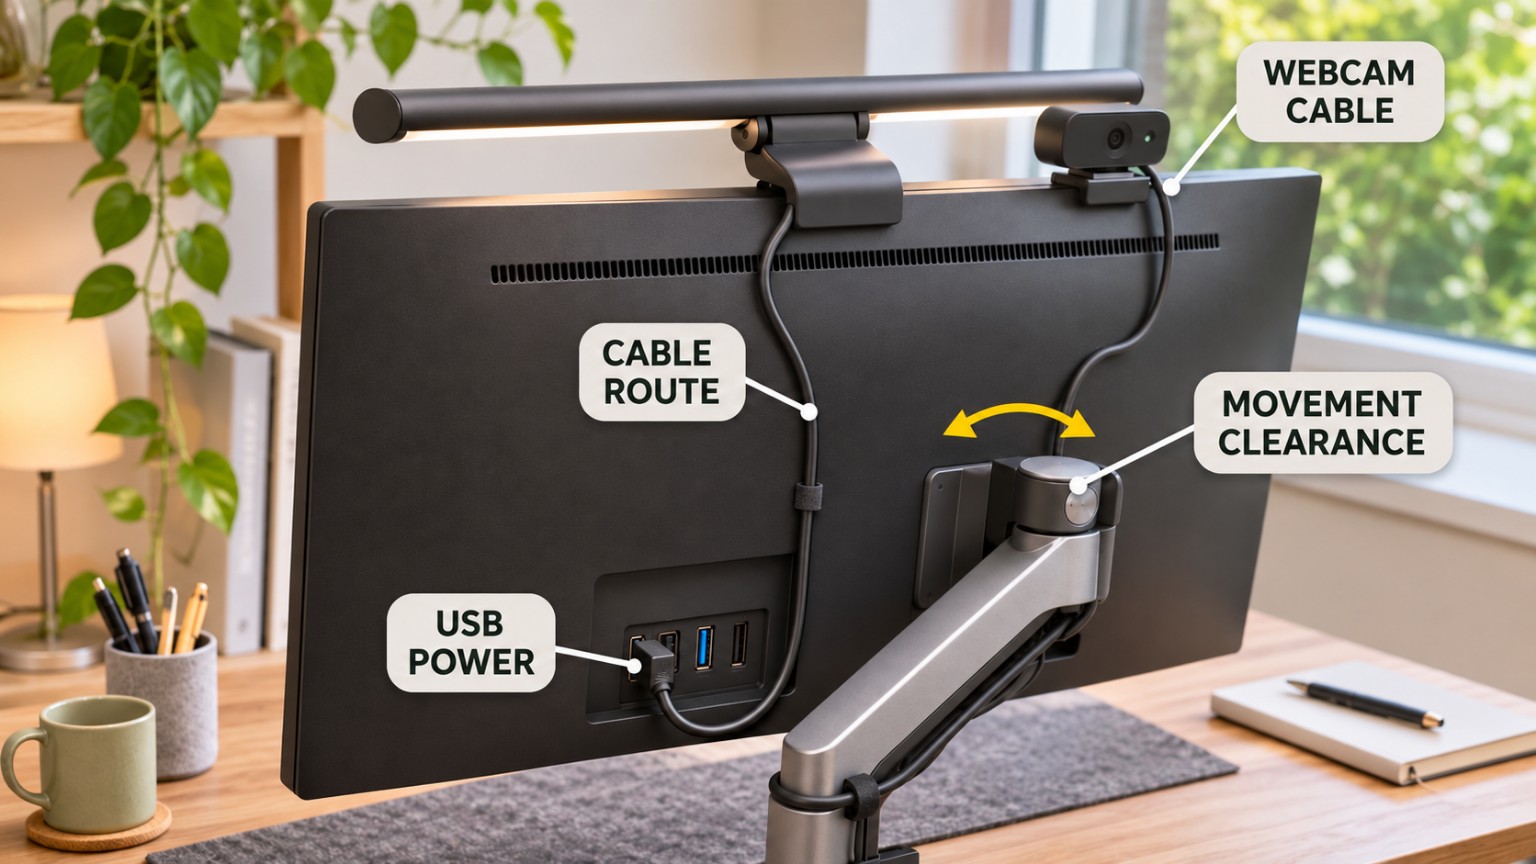
Trace the cable from the light bar to the actual power source before buying:
- Does the cable need to drop behind the monitor?
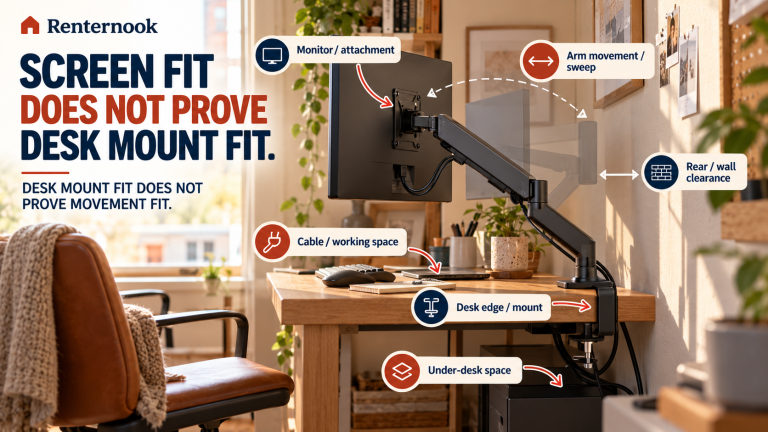
- Will it cross a monitor-arm hinge or movement path?
- Will it interfere with a webcam cable?
- Is the USB source on the correct side of the desk?
- Will the cable stay clear when the monitor is tilted, raised, or moved?
- Can the cable be routed without being sharply bent or pinched?
If your monitor sits on an arm, cable routing becomes part of the movement check. Renternook’s monitor-arms guide for small desks uses the same principle: the working setup matters more than one static product dimension.
7. Check the working light coverage, not just the bar length
The two examples are similar in nominal bar length:
- BenQ ScreenBar Pro: 50 cm
- Quntis Focus 51cm Pro+: 51 cm
That one-centimeter difference is not enough to tell you which product will better illuminate your working area.
Instead, define the area you actually need to light:
- keyboard;
- mouse area;
- notebook;
- paper documents;
- calculator;
- or another task area beside the keyboard.
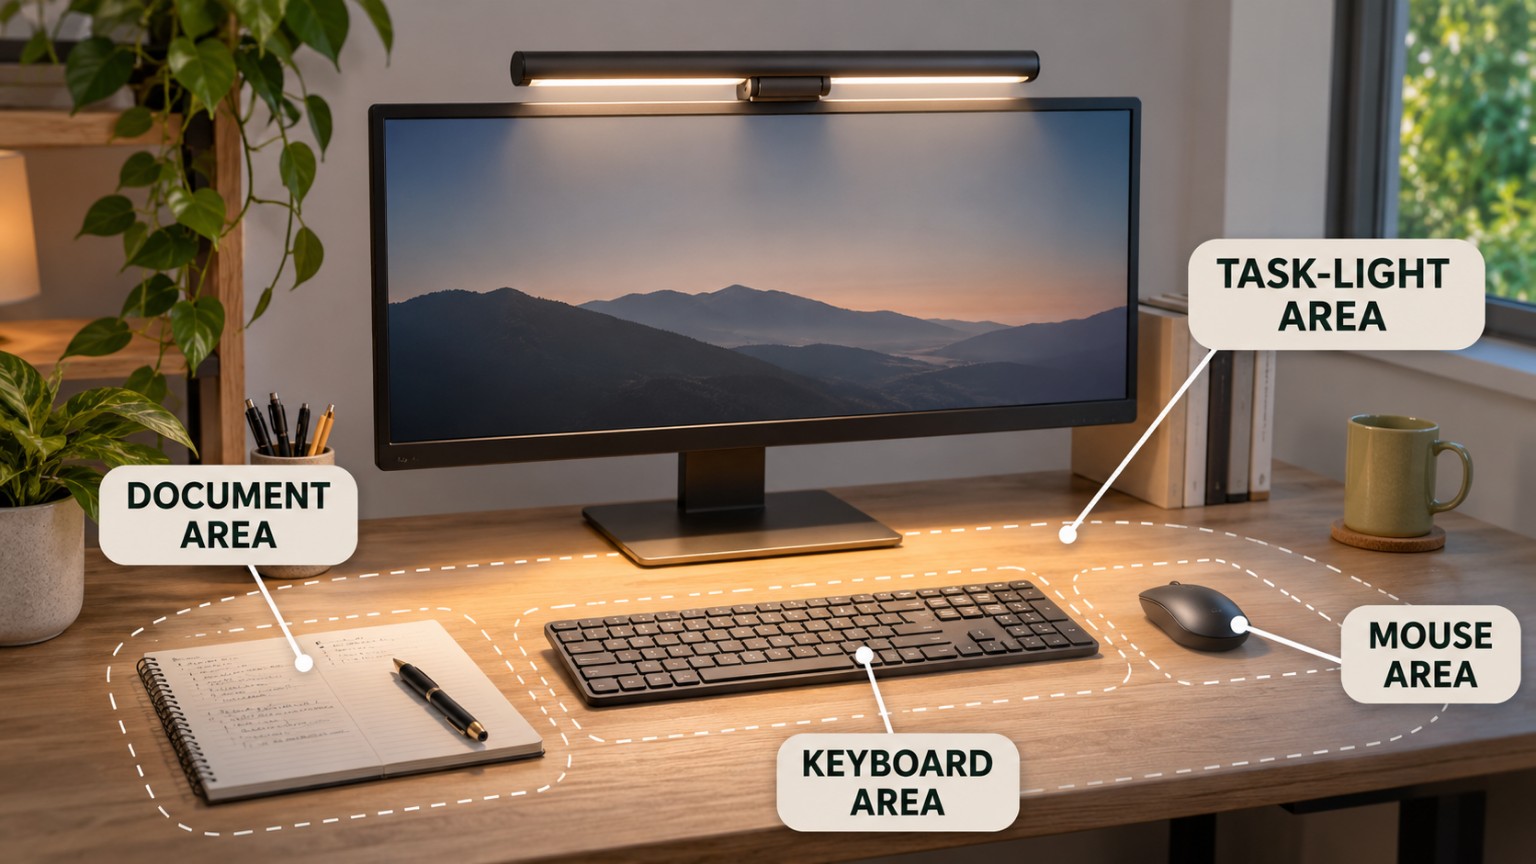
Then check whether the exact installed position and available adjustment can direct useful light into that area without creating a new problem on your screen or desk.
This guide does not make a universal glare-free guarantee for either product. Screen reflections, desk materials, monitor angle, room lighting, and user position can all change the result.
8. Separate published dimensions from the installed envelope
A product’s published body dimensions and the space it occupies after installation are not always the same thing.
For the BenQ ScreenBar Pro, available product documentation includes published overall dimensions of 50 × 13.5 × 9.2 cm and a weight of 0.62 kg.
For the Quntis Focus 51cm Pro+, available product documentation establishes the 51 cm bar length but does not establish the full installed envelope or product weight.
Do not invent those missing values from product photos or transfer dimensions from a nearby model.
If the area behind or above your monitor is tight, the missing installed-envelope value is a real buying uncertainty. Check the current exact-model documentation or measure the available space conservatively before purchase.
9. Compare the products by the uncertainty you need to solve
This is not a winner-versus-loser comparison.
BenQ ScreenBar Pro 9H.W4KWT.WC6 provides the following documented details:
- a published 0.17–2.56 in monitor-thickness range;
- published overall dimensions of 50 × 13.5 × 9.2 cm;
- a published weight of 0.62 kg;
- USB-C power information of 5V and maximum 8.5W;
- a 2700–6500K published color-temperature range;
- and an ultrasonic presence sensor.
Those facts still do not prove fit with every curved monitor, webcam, vent layout, or rear housing.
Quntis Focus 51cm Pro+ F51BK / LI-HY-0208-BK provides the following documented details:
- a 51 cm monitor-light-bar format;
- USB-C 5V/1A power information;
- a remote control;
- a 2-hour timer;
- a published 3000–6500K color-temperature range;
- and an example of why conflicting monitor-thickness sources must remain visible.
For Quntis, preserve these boundaries:
- use 2.36 in as the conservative maximum thickness screen in this guide because the available sources conflict;
- the full installed envelope remains unknown;
- product weight remains unknown;
- remote battery details remain unknown.
Unknown does not mean bad. It means the research does not establish the value strongly enough to publish it as fact.
10. Run a dry-fit checklist before you buy
You can screen most of the important fit risks before ordering.
- Measure the monitor thickness at the intended mounting point.
- Photograph or inspect the rear housing. Look for curves, steps, bulges, and vents.
- Mark the webcam position. Decide whether the light bar and webcam need the same top-edge space.
- Identify the power source. Verify the required output rather than assuming any USB port will work.
- Trace the cable path. Include monitor movement if the display is on an arm or adjustable stand.
- Define the working light zone. Keyboard-only, keyboard plus documents, or a wider task area.
- Check the room-lighting context. Reflections and glare depend on the real setup, not only the light bar.
- Recheck the exact model before purchase. Product pages and specifications can change.
Common mistakes to avoid
Mistake 1: Buying from screen size alone
A monitor’s diagonal size does not tell you the thickness, top-edge geometry, back shape, webcam position, or vent layout.
Mistake 2: Treating the thickness range as universal compatibility
Thickness is one gate. Curvature and rear geometry still matter.
Mistake 3: Forgetting the webcam
If both accessories want the center of the top bezel, you have an interference problem to solve before buying.
Mistake 4: Assuming any USB-C port is sufficient
Connector type and power output are different questions. Verify the output of the port or charger you plan to use.
Mistake 5: Ignoring cable movement
A cable route that looks clean with a fixed monitor may become awkward when the monitor tilts, raises, or moves on an arm.
Mistake 6: Turning light-bar length into a coverage guarantee
A 50 cm or 51 cm bar length does not, by itself, establish useful light coverage for your exact keyboard and document area.
Mistake 7: Silently resolving the Quntis thickness conflict
Do not do that. The available evidence contains different thickness statements. This guide uses 2.36 in as the conservative cap and leaves the conflict visible.
Mistake 8: Filling unknown values from a nearby model
The Quntis installed envelope, product weight, and remote battery details remain unknown in the available documentation reviewed for this guide. Do not borrow those fields from another Quntis model or infer them from photographs.
FAQ
Will a monitor light bar fit any flat monitor?
No universal fit claim is supported here. Measure the exact top-edge thickness and check the rear housing, mount seating, webcam position, vents, and cable path.
What about curved monitors?
Curvature is a separate geometry check. A published thickness range does not establish compatibility with every curved screen or rear housing. Verify the exact monitor and exact light-bar mounting method.
Can I keep a webcam on top of the monitor?
Possibly, but it depends on the physical positions of both devices. Check whether the webcam and light-bar mount compete for the same top-edge area and whether either device blocks the other.
Can I power the light bar from my monitor’s USB port?
Only if the exact port provides the power required by the exact light bar. The documented BenQ specification is USB-C 5V with maximum 8.5W. The documented Quntis specification is USB-C 5V/1A. Verify the source you plan to use.
Which product is better for a small desk?
This guide does not rank them. Both remove the need for a desktop lamp base, but the useful choice depends on your monitor geometry, webcam and vent clearance, USB power path, cable routing, and working-area needs.
Does a monitor light bar protect my eyes?
This guide does not make a medical eye-protection claim. Treat the products as task-lighting equipment and evaluate comfort and lighting in your actual setup.
Is either product guaranteed to be glare-free?
No universal glare-free guarantee is made here. Reflections and perceived glare depend on the monitor, desk surface, light-bar position, room lighting, and user position.
Final takeaway
A monitor light bar can be a practical small-home-office tool because it moves the task light off the desktop.
But the useful buying question is not:
Which monitor light bar is best?
It is:
Will this exact light bar mount correctly on this exact monitor, clear the webcam and vents, reach a suitable USB power source, route its cable cleanly, and light the keyboard and documents I actually use?
Use that order:
- Measure monitor thickness.
- Check curvature and rear shape.
- Check webcam and vent clearance.
- Verify USB power.
- Trace cable routing.
- Check the real working light zone.
- Preserve conflicts and unknowns instead of guessing.
- Then choose the product whose documented requirements fit your setup.
Measure the system first. Buy the light bar second.
Sources and methodology
This article uses the product documentation reviewed for BenQ ScreenBar Pro model 9H.W4KWT.WC6 and Quntis Focus 51cm Pro+ model F51BK / LI-HY-0208-BK.
Product-specific statements are limited to fields established by that documentation. The guide does not claim hands-on testing, does not rank the two products, does not make a universal monitor-fit or glare-free guarantee, and does not make a medical eye-protection claim.
The Quntis monitor-thickness evidence contains a source conflict. The product-page material gives a 0.12–2.36 in range, while the manual states a larger 3.94 in maximum. This guide uses 2.36 in as the conservative cap rather than silently combining the two claims.
The Quntis installed envelope, product weight, and remote battery details remain unknown in the reviewed documentation and are not inferred from adjacent models or product photographs.
Product specifications and listing content can change. Recheck the current exact-model documentation before buying.