Monitor Arms for Small Desks: Check the Desk Edge, Screen Weight, and Working Reach Before You Buy
A monitor arm looks like a simple way to reclaim desk space. The screen leaves its stand, the desktop looks cleaner, and the monitor can move instead of staying fixed in one place.
But small desks make the buying decision more demanding, not less.
A monitor can fall inside an arm’s published weight range and still be a poor fit for the desk. A clamp can be rated for the desk thickness and still run into an apron, frame, cable tray, or support rail underneath. An arm can reach far enough on paper and still collide with a wall before the screen reaches the position you actually want.
That is why the fit-first rule for this guide is:
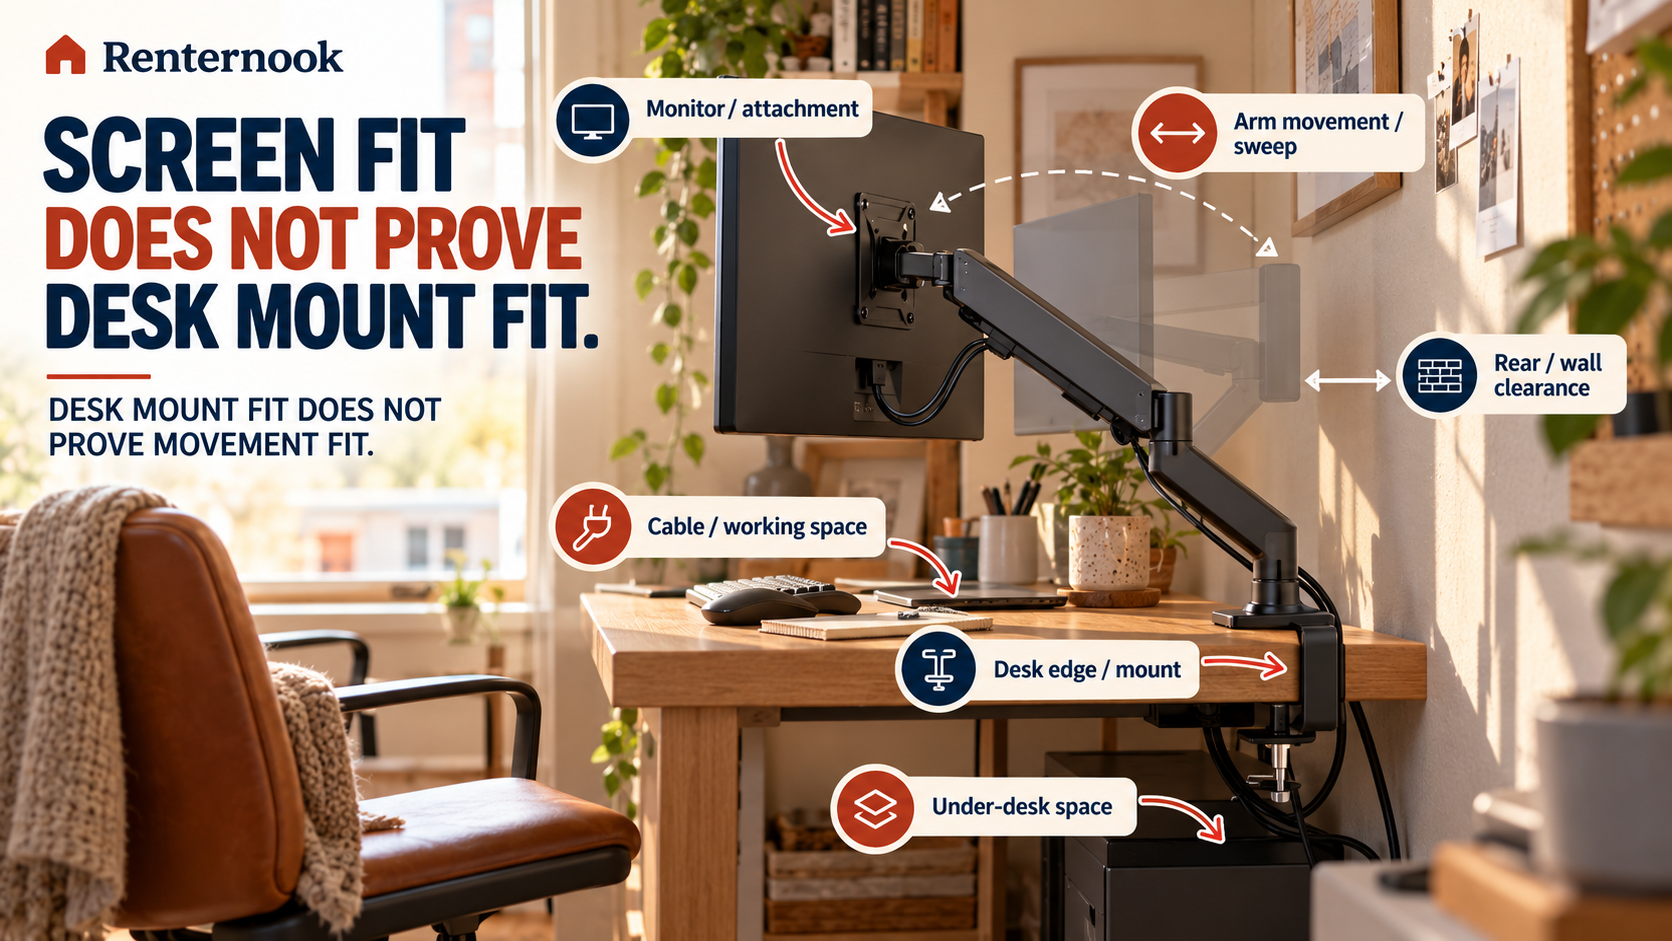
Screen fit does not prove desk-mount fit. Desk-mount fit does not prove movement fit. Movement fit does not prove rear-clearance fit. Rear-clearance fit does not prove cable or working-desk fit.
The goal is not to find one universal “best” monitor arm. It is to verify whether your exact monitor + exact arm + exact desk can work together as a system.
The small-desk monitor-arm decision is a system check
Before comparing products, work through the decision in this order:
- Monitor weight and VESA
- Desk edge and desk thickness
- Clamp or grommet interface
- Under-desk obstructions
- Arm reach and sweep
- Wall or rear clearance
- Cable routing and usable desk space
Skipping ahead creates false confidence.
For example, knowing that an arm supports your monitor’s weight does not tell you whether its clamp can physically attach to your desk. Knowing that the clamp fits the desktop thickness does not tell you whether the underside has enough clear space for the mount. And knowing that the arm mounts securely does not tell you whether it can move through the positions you need without hitting a wall.
For a small desk, the whole chain matters.
Quick comparison: two different monitor-arm decision roles
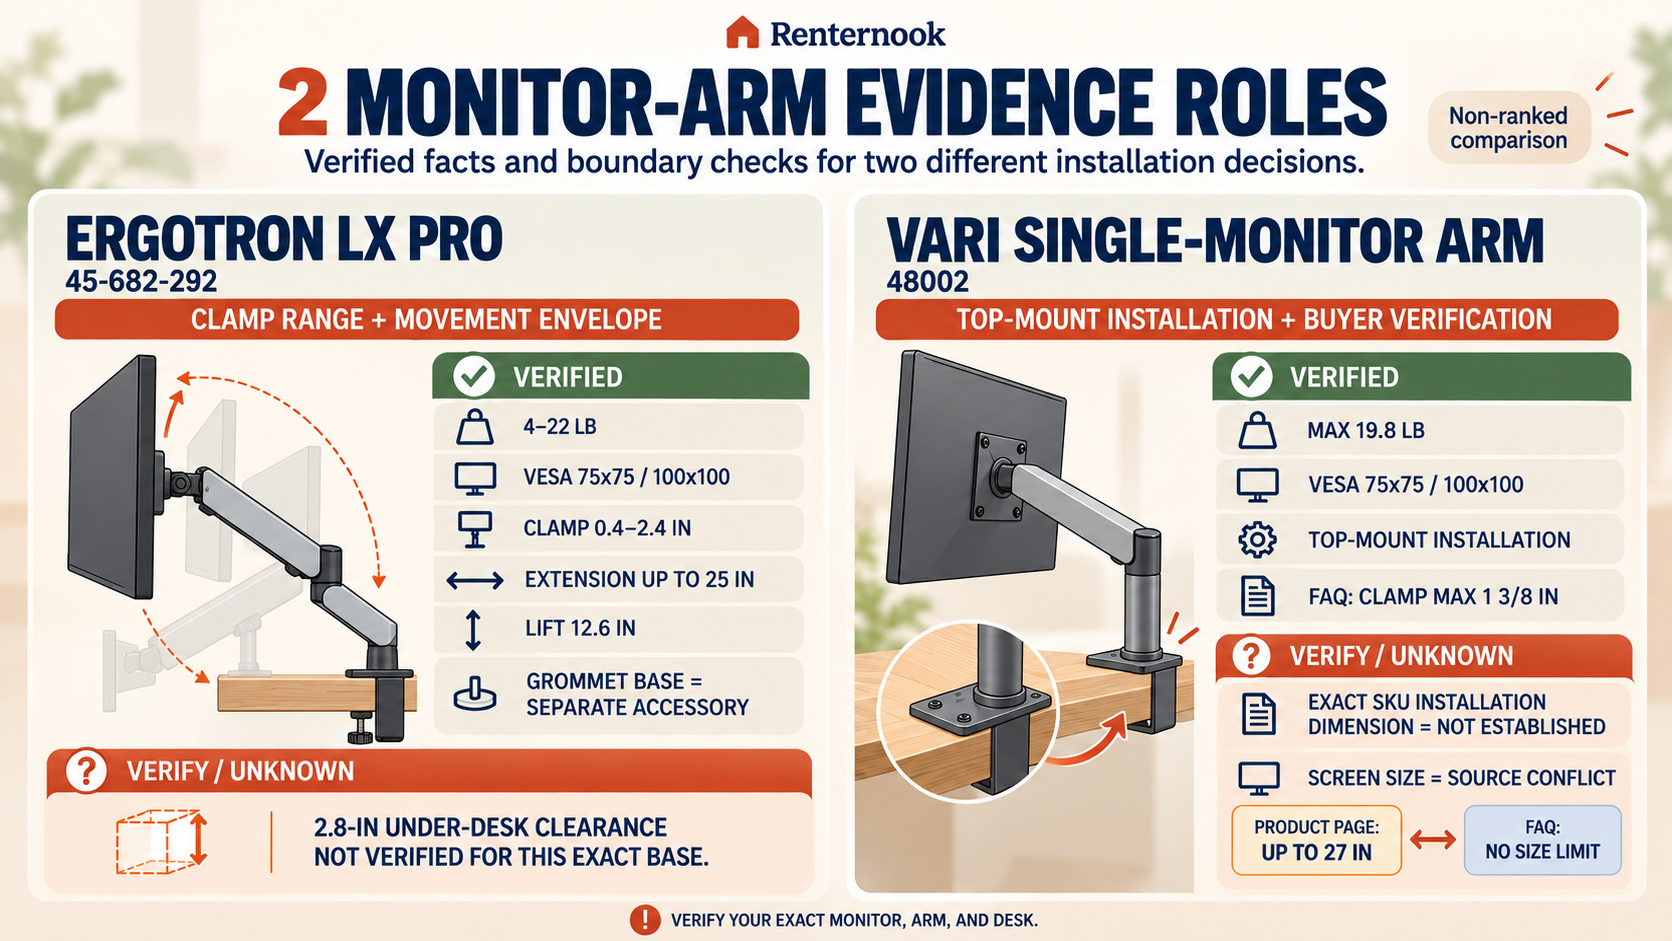
These two products are used as non-ranked examples because they expose different fit questions. They are not presented as a winner and runner-up.
| Product | Product role | Verified display boundary | VESA | Desk-mount evidence | Movement evidence / boundary |
|---|---|---|---|---|---|
| Ergotron LX Pro Desk Monitor Arm — 45-682-292 | Model-specific clamp range + movement envelope | 4–22 lb | 75 × 75 / 100 × 100 mm | Clamp range 0.4–2.4 in; grommet base is a separate accessory | Extension up to 25 in; lift 12.6 in |
| Vari Single-Monitor Arm — SKU 48002 | Top-mount installation + buyer-verification boundary | 19.8 lb max | 75 × 75 / 100 × 100 mm | Top-mount installation; FAQ states clamp maximum 1 3/8 in | Exact SKU installation dimension not established in the reviewed source evidence |
Two cautions matter immediately:
- For the Ergotron, do not treat a 2.8-in under-desk clearance figure as verified for this exact base.
- For the Vari, screen-size guidance conflicts across first-party material: the product page says up to 27 in, while the FAQ says there is no size limit. This guide preserves that conflict instead of resolving it by inference.
Those are exactly the kinds of details that make a fit-first process useful.
1. Start with the monitor, not the desk
A monitor arm has to support the actual display you plan to mount.
Check two fields first:
Monitor weight
Use the weight of the monitor configuration you will actually mount. Do not assume the arm is compatible just because the screen size looks typical.
The examples in this guide establish:
- Ergotron LX Pro 45-682-292: display range 4–22 lb
- Vari 48002: display maximum 19.8 lb
Weight is only the first gate. It does not prove the monitor will attach to the arm or that the desk can support the mounting system.
VESA pattern
Both products compared in this guide support:
- 75 × 75 mm
- 100 × 100 mm
Verify the exact VESA pattern on your monitor or its manufacturer documentation. Do not infer VESA compatibility from screen size alone.
If your monitor needs an adapter plate or another interface, that is a separate compatibility question and must be verified for the exact monitor and arm.
2. Measure the desk edge and desktop thickness
A monitor arm for a desk has to attach somewhere real.
That means you need to measure the actual mounting zone, not just the overall desk dimensions.
For a clamp mount, check:
- the desktop thickness at the exact mounting point;
- whether the desk edge is flat enough for the mount to sit correctly;
- whether trim, bevels, lips, or unusual edge geometry interfere;
- whether the underside is clear enough for the lower part of the clamp;
- whether the desk construction at that point is suitable under the manufacturer’s instructions.
The reviewed Ergotron source evidence gives a model-specific desk-clamp range of:
0.4–2.4 in
The Vari FAQ states a clamp maximum of:
1 3/8 in
Those numbers should be compared with the desk at the exact point where the arm will mount.
Do not turn a thickness match into a universal desk-fit claim. A desk can fall inside a published thickness range and still have an underside obstruction or construction detail that prevents installation.
3. Check clamp vs. grommet as separate mounting interfaces
“Desk mount” is not one universal interface.
Two common paths are:
- edge clamp
- grommet / through-hole mounting
They change what you need to verify.
For the Ergotron model reviewed here, the grommet base is a separate accessory. Do not assume the standard clamp configuration automatically includes the grommet solution you need.
For the Vari model reviewed here, the first-party sources establish top-mount installation. That is useful for a small desk because it makes the installation approach part of the buying decision rather than an afterthought.
Before buying, confirm the exact mounting hardware supplied with the exact SKU and follow the manufacturer installation instructions. If your desk requires a different mounting interface, verify that interface explicitly instead of assuming it is included.
4. Inspect the underside before assuming the clamp will fit
This is one of the easiest small-desk checks to miss.
Look under the mounting point.
Possible obstructions include:
- desk aprons;
- metal frames;
- reinforcement rails;
- drawers;
- cable trays;
- control boxes on sit-stand desks;
- crossbars;
- brackets;
- shelves mounted beneath the top.
The published desktop thickness can be correct while the clamp still has nowhere to go.
For this reason, this guide does not publish an unverified universal under-desk clearance requirement for either product compared in this guide.
In particular, the reviewed Ergotron source evidence does not establish the previously encountered 2.8-in under-desk clearance figure for this exact base. Treat the required underside geometry as something to verify from the exact model’s installation material and your real desk.
Unknown is not compatibility.
5. Treat arm reach and sweep as working-space dimensions
A monitor arm creates a moving footprint.
That footprint matters more on a small desk because the monitor may need to move through a limited zone between:
- the wall;
- shelves;
- a laptop;
- speakers;
- a printer;
- a desk lamp;
- another monitor;
- the user’s seating position.
The Ergotron LX Pro 45-682-292 provides useful model-specific movement evidence:
- extension up to 25 in
- lift 12.6 in
These numbers help define the arm’s potential movement envelope, but they do not prove that every position inside that envelope works in your room.
The critical question is not simply, “How far can the arm extend?”
It is:
Can the arm move through the positions I actually need without colliding with the wall, furniture, or the rest of the desk setup?
For the Vari 48002, do not invent an exact movement dimension from another model or family. Use only exact-SKU installation and product information when making a buying decision.
6. Check wall and rear clearance in the actual monitor positions
A small desk is often pushed close to a wall.
That creates a common monitor-arm problem: the arm needs rear space to fold, pivot, or reposition the screen.
A desk can be deep enough for the monitor itself while still being too close to the wall for the arm’s movement path.
Test your planned setup conceptually in at least three positions:
- normal working position
- screen pulled forward
- screen pushed back or repositioned
If the arm folds behind the display, the rear movement path may become the limiting dimension.
This guide does not publish a universal wall-clearance number because the requirement changes with:
- the exact arm;
- mounting position;
- screen dimensions;
- screen orientation;
- desired viewing position;
- desk depth;
- wall distance.
If the manufacturer publishes a model-specific rear-clearance or movement requirement, use that value. Otherwise, preserve the field as something you still need to verify in your real layout.
7. Plan the cable path through the full movement range
Cable management is not just about making the desk look tidy.
The power cable and video cable have to survive the monitor’s movement path without becoming too tight, snagging, or pulling against a connector.
Check:
- where the monitor ports are located;
- how the cables enter the arm’s management path;
- how much slack is needed when the screen moves forward or upward;
- whether the cables cross a desk edge or wall point;
- whether the desk still has usable working space after the cable route is established.
An arm can be mechanically compatible while the cable path is impractical.
That is why cable / working-desk fit is a separate decision gate in this article.
Ergotron LX Pro 45-682-292: model-specific clamp and movement evidence
The Ergotron LX Pro is the example in this article with published clamp range + published movement envelope.
Reviewed source evidence includes:
- Model: 45-682-292
- Display weight: 4–22 lb
- VESA: 75 × 75 / 100 × 100 mm
- Desk-clamp range: 0.4–2.4 in
- Extension: up to 25 in
- Lift: 12.6 in
That gives the buyer several concrete pre-purchase checks.
Check the monitor
Confirm that the monitor’s actual mounted weight and VESA interface fit the published boundaries.
Check the desk thickness
Measure the exact clamp location and compare it with the 0.4–2.4-in range.
Check the underside
Do not assume a thickness match proves the lower clamp can physically fit. The reviewed source evidence does not verify the 2.8-in under-desk clearance figure for this exact base.
Check grommet plans separately
The grommet base is a separate accessory. If you intend to use a through-desk mounting method, verify the exact accessory, hole/interface requirements, and installation instructions.
Check the movement envelope
Use the published extension and lift as model-specific movement references, then compare them with the real wall distance and working positions you need.
Best buyer question for this role:
Does my exact monitor meet the weight and VESA requirements, and does my exact desk provide both the published clamp thickness and the real installation space needed for this base and movement path?
Vari Single-Monitor Arm 48002: top-mount installation with important verification boundaries
The Vari Single-Monitor Arm plays a different role in this guide.
Reviewed source evidence includes:
- SKU: 48002
- Display maximum: 19.8 lb
- VESA: 75 × 75 / 100 × 100 mm
- Installation: top-mount
- FAQ clamp maximum: 1 3/8 in
The useful lesson here is not just the product specification. It is the need to preserve source boundaries when different first-party materials do not give one clean answer.
Screen-size conflict
The current product page states:
up to 27 in
The FAQ states:
no size limit
Those statements conflict.
This article does not pick one and silently discard the other. It also does not turn screen size into the primary compatibility rule.
Use the verified 19.8-lb maximum, verified VESA patterns, and the exact current installation guidance for the SKU. Then verify the specific monitor rather than assuming that one broad screen-size statement settles the question.
Clamp boundary
The FAQ states a clamp maximum of 1 3/8 in.
However, the exact-SKU installation dimension is not established in the reviewed source evidence. Do not invent a missing dimension or borrow one from a different Vari model.
Top-mount workflow
Because the product uses a top-mount installation approach, the buyer still needs to verify:
- desk-edge geometry;
- desktop thickness;
- installation access;
- underside obstructions where relevant;
- desk construction;
- final arm movement;
- wall clearance;
- cable movement.
Best buyer question for this role:
Can I verify this exact SKU’s installation against my desk and monitor without relying on the conflicting screen-size language or filling in missing installation dimensions myself?
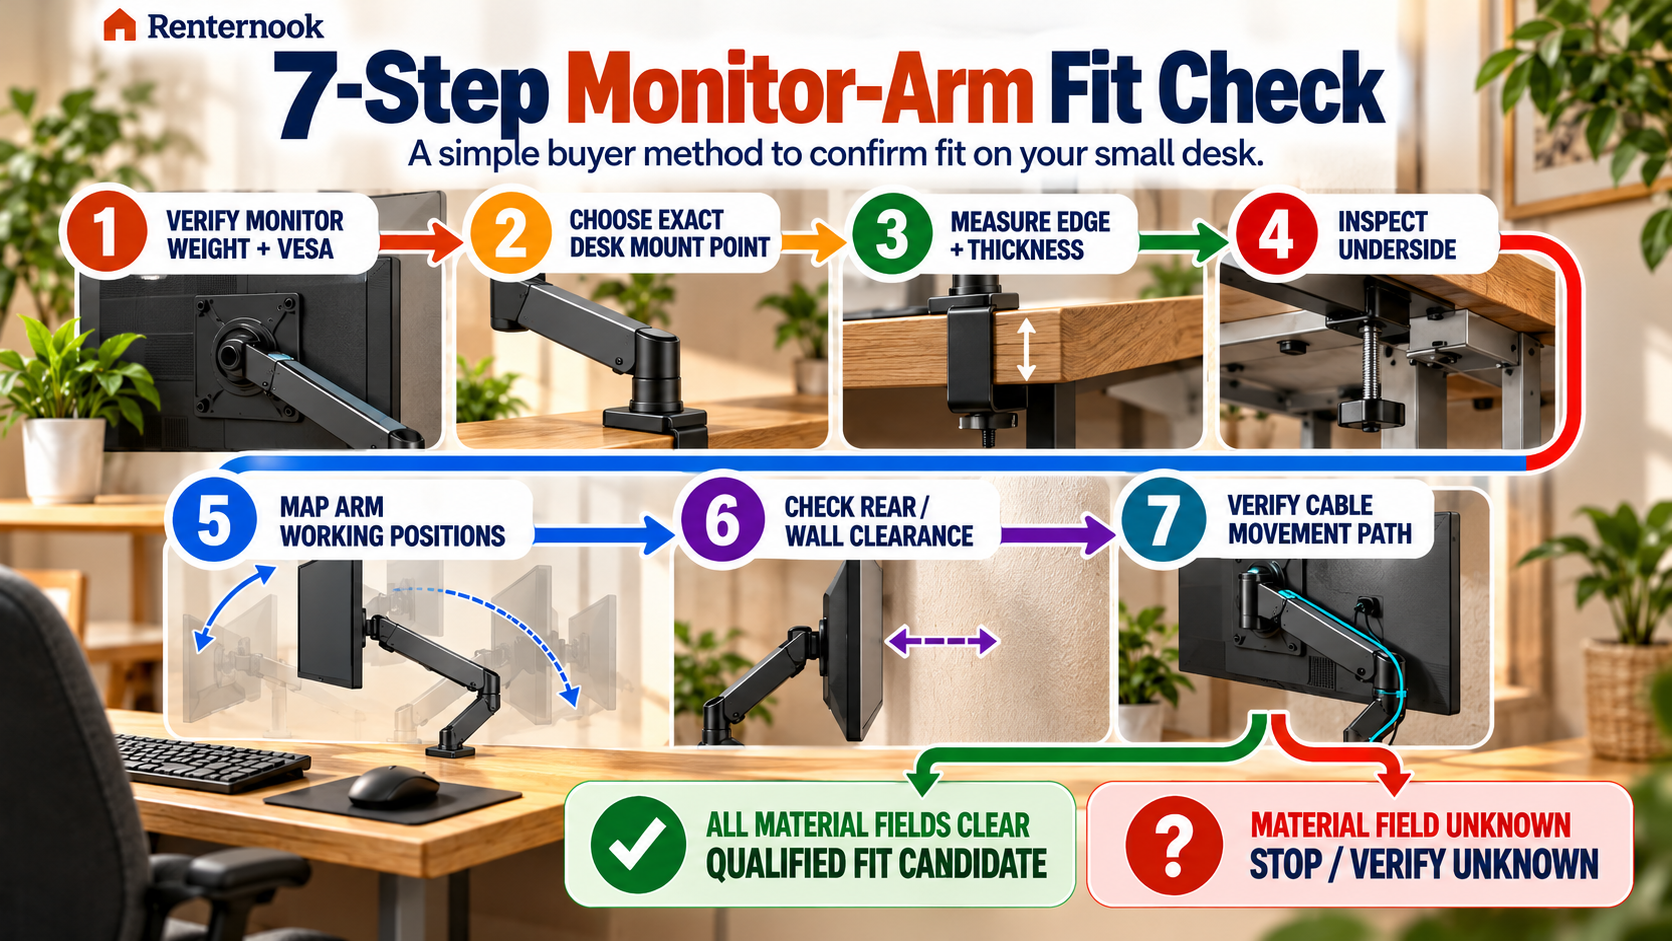
A 7-step fit-first monitor-arm check before you buy
Use this sequence before ordering any monitor arm.
Step 1 — Verify the exact monitor
Record:
- exact model;
- mounted weight;
- VESA pattern;
- any required adapter or attachment interface.
Do not use screen size as a substitute for weight and mounting compatibility.
Step 2 — Choose the exact desk mounting point
Do not measure a random part of the desktop.
Choose the actual edge or hole location where the mount would sit.
Step 3 — Measure the desk thickness and edge geometry
Compare the real measurement with the exact arm’s published clamp range or grommet requirements.
Step 4 — Inspect the underside
Look for aprons, frames, drawers, rails, trays, brackets, cables, motors, and controls.
If you cannot verify the required installation space, keep it unknown.
Step 5 — Map the arm’s working positions
Think about where the display needs to be for normal work, close-up work, and repositioning.
Published extension or lift does not prove the room can accommodate the full movement.
Step 6 — Check the rear wall and nearby objects
Make sure the arm has a workable path behind and around the screen.
Do not assume that a shallow desk automatically benefits from a long-reach arm.
Step 7 — Route the cables through the movement envelope
Leave enough slack for the planned positions without turning the cables into the limiting factor.
Only after all seven checks are clear should you treat the setup as a qualified fit candidate.
Common monitor-arm buying mistakes on small desks
Mistake 1: “My monitor is under the weight limit, so it fits”
No. Weight compatibility is only one gate.
You still need VESA, desk mounting, movement, wall, and cable compatibility.
Mistake 2: measuring desktop thickness but not looking underneath
A frame or apron can block the mount even when the top is inside the published clamp range.
Mistake 3: assuming every desk material is suitable
This guide does not claim universal compatibility with particleboard, hollow-core tops, glass, thin composite surfaces, or any other desk construction.
Use the exact manufacturer’s installation requirements and verify the desk construction.
Mistake 4: assuming grommet mounting is automatically included
For the Ergotron model reviewed here, the grommet base is a separate accessory.
Always verify what comes with the exact configuration you are buying.
Mistake 5: treating screen size as a universal rule
The Vari evidence shows why this is risky: first-party screen-size language itself conflicts.
Use exact weight, VESA, mounting, and installation evidence instead of forcing a simple size-only rule.
Mistake 6: forgetting the wall behind the desk
An arm that works on an open demonstration table can behave differently when the desk is close to a wall.
Mistake 7: assuming “monitor arm” automatically means renter-safe or damage-free
It does not.
This article makes no universal renter-safe claim and no no-damage guarantee.
If the setup affects the desk, wall, lease, or building rules, verify those requirements separately.
Which product role addresses the uncertainty you need to solve?
This is not a ranking.
Choose the example that exposes the uncertainty you need to solve.
The Ergotron LX Pro 45-682-292 role is useful when you need:
- a model-specific published clamp thickness range;
- a published display-weight range;
- verified VESA support;
- published extension and lift values;
- a clear reminder that grommet mounting is a separate accessory path.
The Vari 48002 role is useful when you need:
- a top-mount installation example;
- a verified 19.8-lb display maximum;
- verified 75 × 75 / 100 × 100 VESA support;
- a published FAQ clamp maximum;
- an example of why conflicting source language must remain a buyer-verification issue instead of being silently normalized.
Neither role proves that the product fits your desk.
Your desk still has to pass the real installation check.
Final pre-buy checklist
Before buying a monitor arm for a small desk, confirm all of the following:
If one of those items is still unknown, the system fit is still unverified.
Final takeaway
A monitor arm can make a small desk more flexible, but the product is only one part of the system.
The real buying decision is:
Will this exact monitor attach to this exact arm, will this exact arm mount to this exact desk, and will the whole system move through the positions I need without creating a new wall, cable, or working-space problem?
For small desks, that is a much more useful question than simply asking whether the arm supports the monitor’s screen size.
Check the monitor. Check the mount. Check the desk edge. Check underneath. Check the movement. Check the wall. Check the cables.
Then buy only when the whole system is verified.
How we researched this guide
This article uses first-party source material reviewed for the two exact models in this guide.
The product-specific statements are limited to details verified in the reviewed first-party sources. Material unknowns and source conflicts are kept visible instead of being resolved by inference.
This guide does not claim hands-on physical testing of these monitor arms. It does not rank the two products, claim universal desk or VESA compatibility, guarantee no desk damage, make a universal renter-safe claim, state unsupported health benefits, or publish unverified price, stock, or affiliate-eligibility claims.
The buyer’s own monitor, desk construction, mounting location, wall distance, cable path, and installation conditions remain part of the final verification.