No-Drill Blackout Window Shades for Renters: Measure the Window Before You Buy
A window shade can be labeled “blackout” and still leave a bright line of light around the edges. It can also be described as “no drill” and still be a poor fit for a rental: adhesive may not suit the trim, a tension-mounted headrail may need more depth than the frame provides, or the shade may interfere with a window handle. The buying problem is not simply finding darker fabric. It is finding a light-control system that can be mounted in the actual opening, operated normally, and removed under the restrictions of the home.
For renters, that distinction matters. A temporary shade that you can trim and stick in place solves a different job from a made-to-measure cellular shade held in an inside-mount tension frame. Both avoid ordinary drill-in brackets, but their contact surfaces, measurement requirements, appearance, everyday operation, and removal tradeoffs are not interchangeable.
This guide compares two specific, non-ranked options: the Redi Shade Original Paper Blackout Shades, Black Four-Pack (manufacturer part 1602212), and the LazBlinds No Drill Premium Custom Blackout Cellular Shades. The Redi Shade system uses trimmed paper and adhesive for temporary coverage. The LazBlinds system is a custom-sized, cordless cellular shade using a no-drill tension-fit inside mount. The right next step is to identify your window and rental constraints before choosing either product. [1] [2] [6]
Neither product is a universal fit, an assurance of damage-free removal, or a promise of a completely dark room. “Blackout” describes a product's light-control capability; it does not seal the perimeter of a real window. If a critical fit, finish, clearance, or safety fact is unknown for your home, pause the purchase rather than filling the gap with a guess.
The Quick Decision: Which Window Job Are You Solving?
If your immediate problem is an uncovered window during a short lease, a move-in transition, or an inexpensive first pass at bedroom light control, start by evaluating the Redi Shade four-pack. Each listed shade starts at 36 inches wide by 72 inches long before trimming. You measure the usable location, trim the paper shade to suit the chosen mounting arrangement, peel the liner, and attach it to an appropriate surface. This is an adhesive installation with a one-time-application limitation, not a reusable pressure-fit system. [1] [2] [3]
If the goal is an everyday, tailored window covering that you expect to operate repeatedly, start by evaluating the LazBlinds custom cellular shade. Its maker lists an orderable width range of 16 to 51 inches, height range of 12 to 72 inches, and minimum frame depth of 1.5 inches for this specific product. The window must allow an appropriate inside-mounted tension arrangement, and the correct custom measurements must be submitted before production. A narrow, uneven, shallow, or obstructed frame can change the decision. [6]
Do not treat these as first place and second place. One is a temporary paper/adhesive approach sold as four pieces; the other is an individually sized cellular/tension-fit approach. A four-pack is not automatically cheaper after accounting for failed adhesion or waste, and a custom shade is not automatically the better purchase if the frame cannot accept it or the lease rules prohibit its installation.
The rest of the guide works in this order: measure the usable opening; qualify the actual mounting surface and frame depth; check how the window moves; decide how much edge light matters; then compare installation, removal, and return exposure. That sequence is more reliable than shopping from a product photo.
Nine Fit Checks to Make Before You Buy
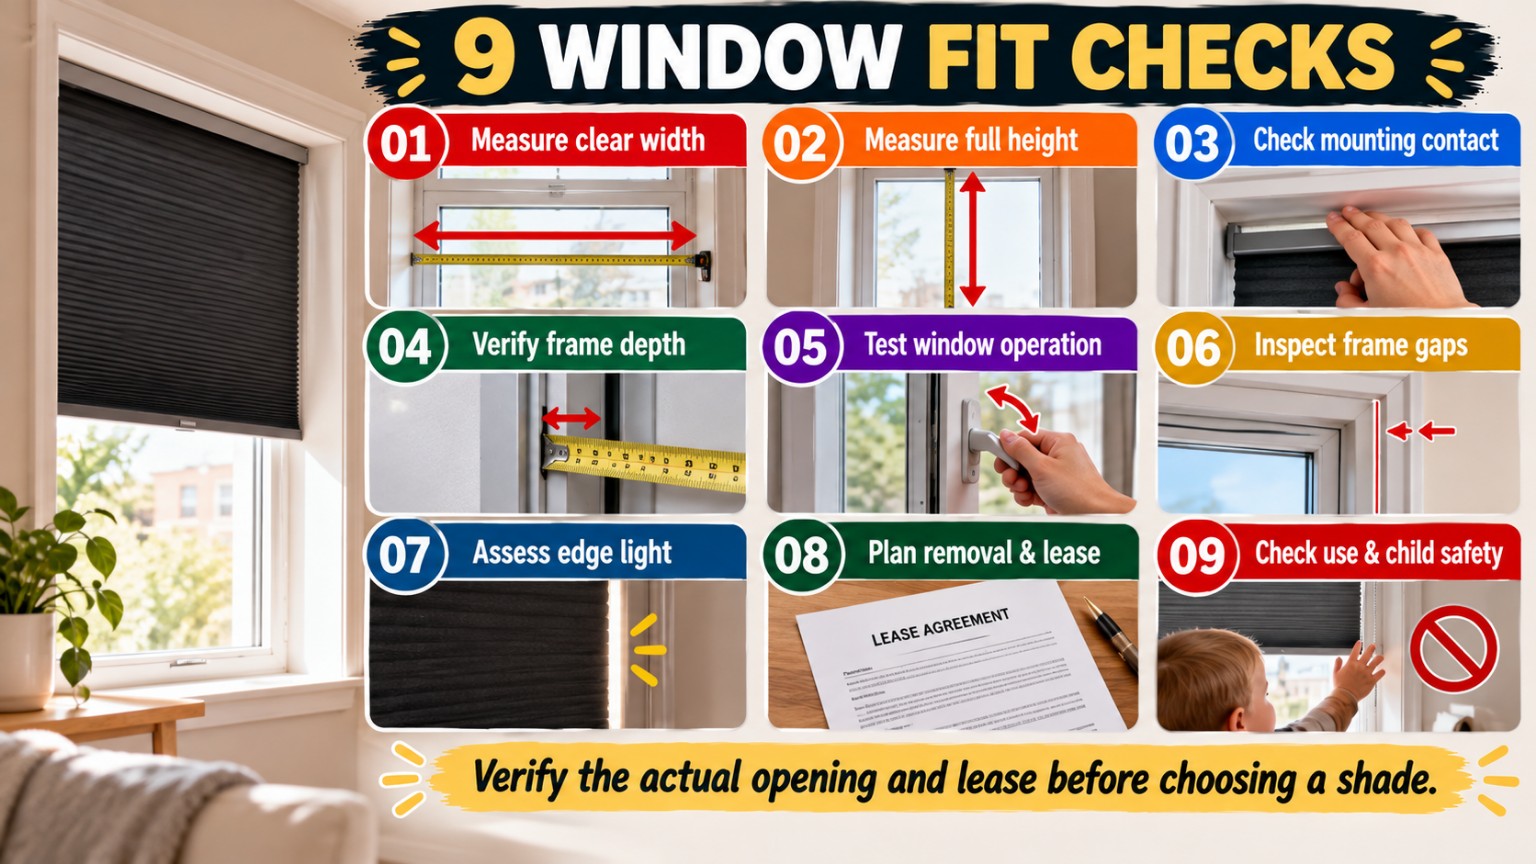
1. Measure the clear window width at more than one point
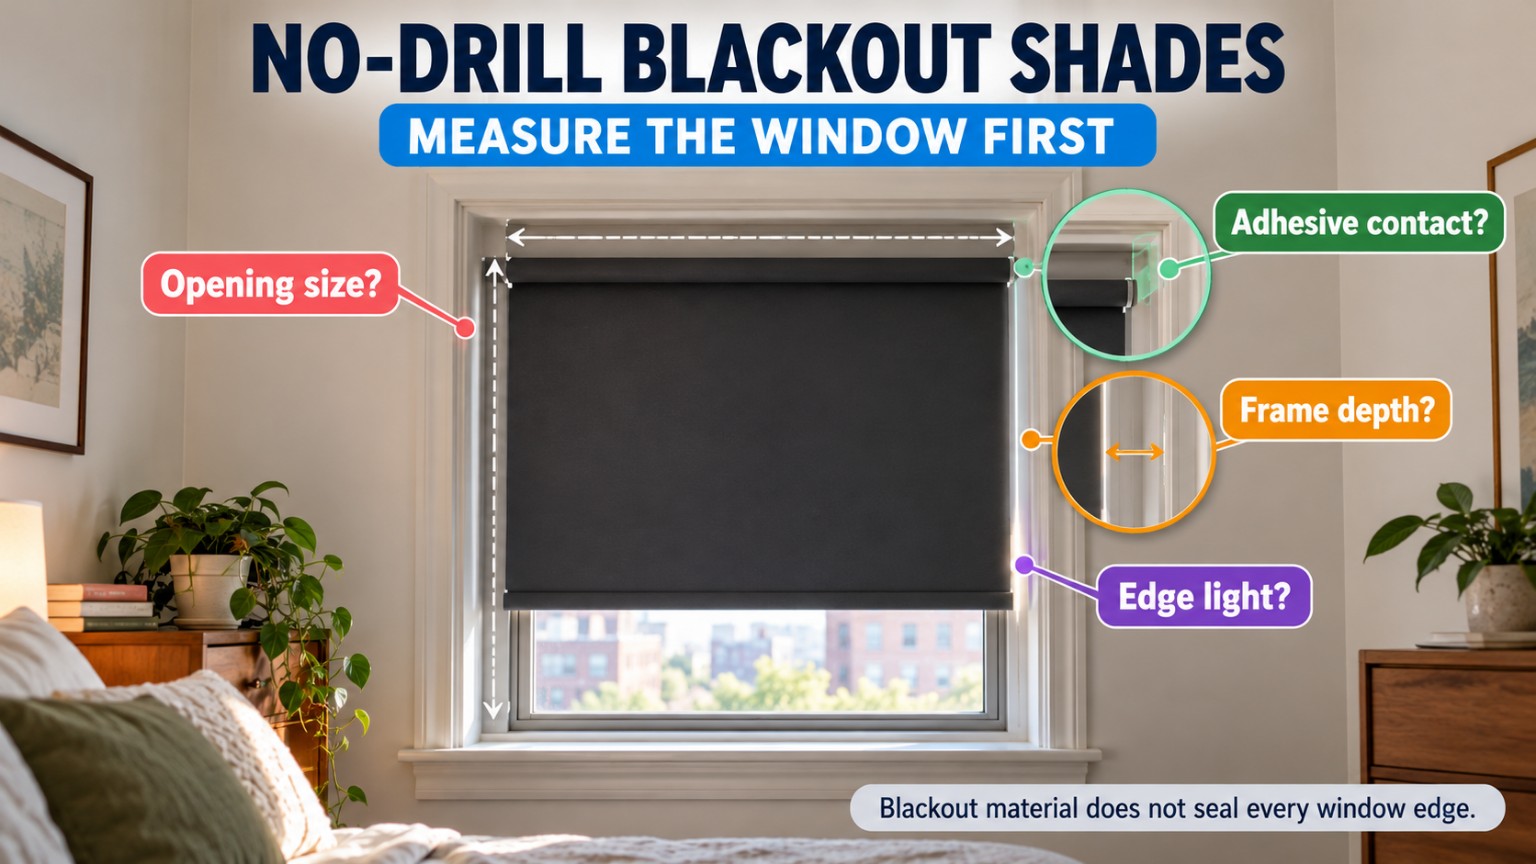
Use a rigid measuring tape and record the inside width near the top, middle, and bottom of the usable opening. Do not substitute the outside trim width or the window's advertised nominal size. Frames may be slightly out of square, bowed, finished unevenly, or partly occupied by stops and trim. Record the narrowest relevant opening and which points are actually available for the mounting method.
For LazBlinds, the manufacturer's measuring guidance calls for widths at three heights and instructs buyers to provide the exact window dimensions without making their own factory allowance deductions. The selected product's sizing system and tolerances must be followed, not a generic rule for a different blind or bracket type. [6]
For Redi Shade, measure the proposed adhesive installation location rather than assuming that the 36-inch untrimmed width will cover every nominally 36-inch window. The maker's Original Shade installation guidance also calls for measuring at multiple points and trimming from the relevant measurement. Choose the inside or outside mounting position before cutting. [1] [4]
2. Measure height and the full lowered coverage area
Take height measurements at the left, middle, and right of the window opening. Note the place where the top attaches, where the bottom of the shade must finish, and anything that changes the clear vertical path: a deep sill, handles, latches, window air-conditioning hardware, or another window treatment.
The locked Redi Shade part starts at 72 inches long before installation and adjustment. Its paper pleats and clip-based handling are not the same as a custom, continuously operated headrail. Do not infer a guaranteed finished drop from an unopened product's maximum length without checking the instructions and the target opening. [1]
The locked LazBlinds product is offered in custom heights from 12 to 72 inches. The manufacturer also discloses a production height tolerance of 0 to +2 inches. That published tolerance is a reason to verify the intended bottom clearance and handling space rather than assuming a perfectly exact finished dimension. [6]
3. Confirm where the mounting force will actually go
“No drill” is not a single installation method. Redi Shade depends on pre-applied adhesive making contact with a suitable, prepared surface. LazBlinds relies on its no-drill tension mechanism contacting the inside frame. The wall, casing, sash, glass, and recess should not be treated as interchangeable mounting zones.
Draw a simple picture of the window and mark the intended contact area. Is it broad, flat, clean, smooth, dry, and stable? Is it freshly painted, textured, wallpapered, delicate, crumbly, or finished in a way the product maker discourages? Would the load push against trim that is loose or not intended for that purpose? If you cannot identify an acceptable location, the mounting method has not passed.
Redi Shade specifically cautions against several surface types for its adhesive Original shades, including wallpapered, freshly painted, high-gloss, and textured surfaces; it also warns against certain wood and wall finishes. Follow the manufacturer's exact current surface guidance, and do not assume a generic household adhesive or separate tape can substitute for its supplied adhesive. [3]
4. Measure frame depth before considering a tension-fit shade
A window recess may be wide enough for the LazBlinds custom shade but not deep enough for its no-drill tension installation. The maker gives a minimum frame depth of 1.5 inches for the locked premium custom blackout cellular shade. Measure the actual usable depth at the intended headrail position, not the full distance between the wall surface and the glass. Stops, seals, latches, rounded moldings, and protrusions can reduce the flat area available to the tension assembly. [6]
The maker's more general measuring instructions mention a typical 2-inch planning check while noting that some models fit 1.5 inches. For this selected product, use the 1.5-inch product-specific published minimum as a prerequisite, not a blanket guarantee. Where the recess is borderline, uneven, or weak, verify the exact frame geometry and manufacturer's fitting instructions before ordering.
The temporary Redi Shade does not use this same tension-fit-depth test, but it still needs a suitable adhesive landing zone. Passing the depth check for one product does not prove the other mounting method works.
5. Check the entire window-opening and closing path
Open, close, tilt, latch, and lock the actual window as you normally would. Watch the path of crank handles, sash locks, sliding tracks, screens, tilt mechanisms, and adjacent doors. The top rail, side fabric edges, hanging pleats, and clips may occupy space that appears clear when the window is shut.
For the adhesive shade, decide whether your intended top position would interfere with a moving sash or whether the lowered paper will be caught by a handle. For the tension shade, think about headrail and cell stack clearance as well as the lowered fabric. Do not promise that either installed system allows full window operation simply because it does not require screws.
Also preserve necessary ventilation and emergency-use access. If the window must open readily for ordinary use or as an exit, do not create a light-blocking arrangement that makes that function harder to perform. The exact clearance required is specific to the window and home, not a universal number supplied by this guide.
6. Inspect the frame for gaps, bowing, and obstructions
Run your tape across the top, center, and bottom and compare the numbers. Look at the corners and note whether the frame is square, whether moldings project inward, and whether there is an unusually large difference between measuring points.
A tension-fit custom shade must be ordered to the manufacturer's instructions for the actual opening; the maker's specified tolerance does not correct a badly unsuitable frame. Adhesive paper can be cut to width, but trimming does not automatically solve uneven adhesive contact or all side gaps. Do not assume you can simply cut more tightly and avoid every problem.
If the window is out of square, record the dimensions and ask the manufacturer whether the exact selected mounting method is compatible before placing a non-returnable custom order. A photo can help explain the geometry, but it is not a substitute for a measured size or manufacturer approval.
7. Decide how much edge light is acceptable
The difference between light through the shade material and light around the shade is fundamental. Redi Shade describes its Original Paper Blackout product as blocking up to 99% of light. LazBlinds markets its selected custom cellular fabric as blackout. Neither claim establishes that a real room, with real frame edges and perimeter gaps, will have zero visible light. [1] [6]
Observe where daylight enters the room now: above the headrail, down either side, from the sill, through an uncovered transom, or around another nearby window. A shade can reduce transmission through its own panel while leaving a glowing outline. If you need very dark conditions for sleeping, decide whether visible side or bottom leakage would be unacceptable before ordering.
There is no verified, universal edge-gap size or zero-leakage rating for the two locked products in the adopted evidence. Do not convert “blackout fabric” into a certified whole-room darkness claim.
8. Plan removal, cleaning, and the likely lease handover
A removable-looking shade is not necessarily damage-free. The Redi Shade adhesive is designed for a one-time application. Its maker explains a gentle Original Shade removal method but also discusses the possibility of remaining adhesive residue. Whether removal leaves a mark depends on the particular finish, surface condition, installation, and cleaning process. [3] [5]
The LazBlinds product is not mounted with Redi Shade adhesive, but contact pressure, the strength and geometry of the frame, the installation method, and any finish sensitivity still matter. Removal without drilled holes is not a verified promise of zero scuffs, dents, or surface changes on every rental window.
Check your lease, building policy, landlord instructions, and any restrictions on covering ventilation or altering window hardware. Photograph the starting condition when appropriate. If permission is required, get it before installation. There is no universal rule saying that every no-drill shade is allowed in every rental.
9. Check operation, children, and access after the shade is installed
A good fit must remain usable. Think about how you will raise or lower the shade, how far you must reach, whether clips or a pull handle can be used without forcing the mount, and whether furniture blocks access. The Redi Shade Original shades are cordless and use included clips; the selected LazBlinds cellular shade is described by its maker as cordless with a free-stop operation. These are different daily workflows. [1] [6]
The U.S. Consumer Product Safety Commission recommends cordless window coverings where young children are present because accessible cords are a serious strangulation hazard. Cordless selection is important, but it is not a blanket claim that an entire installation is child-proof. Inspect the specific product instructions, mounting security, loose parts, furniture placement, and the surrounding window. [7]
If the installed shade makes window locking, emergency opening, routine cleaning, or safe operation difficult, that is a fit failure even if the ordered width looks correct.
Product 1: Redi Shade Original Paper Blackout Shades, Black Four-Pack (Part 1602212)
The buyer job: temporary, budget-conscious coverage with an adhesive landing zone
This exact product is a four-pack of black paper blackout pleated shades. The locked manufacturer part is 1602212; the individual listed shade size is 36 inches wide by 72 inches long before trimming. Redi Shade describes the Original shades as a trim, peel, and stick solution that needs no drill, screws, or conventional brackets. The product is cordless and uses clips to manage the pleats. The manufacturer's product page and a U.S. retailer's exact-part listing support that identity. [1] [2]
The practical reason to consider it is not that it is “best for all renters.” It is that a pack of temporary coverings may serve a short-term need or several qualifying openings without committing to a custom-sized installed system. The real task is to make sure the intended adhesive surfaces are suitable and the resulting coverage is acceptable.
What to measure and verify for the 36-by-72-inch format
Start with the untrimmed 36-inch width and 72-inch length, then check the finished requirements of your intended mounting arrangement. The shade can be trimmed, but cutting is a one-way change. Measure first, mark deliberately, and use the manufacturer's instructions for the selected inside- or outside-mount location.
The manufacturer says to prepare the surface, measure, trim, peel the liner, and firmly press the adhesive into position. Its Original Shade instructions specify pressure and curing before the shade is operated. Follow those instructions rather than improvising a different adhesive process or assuming the shade will hold equally on every painted or textured surface. [4]
Paper is an important material limitation. Redi Shade says its Original paper shades can be lightly dusted or vacuumed, and that water contact will damage the paper. This is not a washable fabric cellular shade, and it is not suitable to treat as a reusable wet-cleaned panel. [3]
Why removal is part of the buying decision
Redi Shade advises gathering the pleats at the top and gently releasing the shade from one side across the adhesive edge. It also addresses possible leftover residue. The maker explicitly says the Simple Stick adhesive is intended for one-time application; repeat adhesion is not guaranteed, and extra adhesive is not provided or recommended as a general replacement. [3] [5]
That means “temporary” should describe the intended duration and installation style, not a guarantee that you can move the same shade repeatedly between windows without loss of adhesion or finish damage. A short-term rental may still have delicate trim, so material compatibility belongs ahead of the convenience claim.
When to hold the Redi Shade purchase
Pause if the only available contact area is wallpaper, fresh paint, a textured finish, a high-gloss surface, or another material the manufacturer does not recommend. Pause if the required coverage exceeds the usable size of this exact 36-by-72-inch configuration and the proposed workaround has not been verified. Pause if you expect to remove and reattach the same adhesive shade repeatedly, or if the window must operate through a path the paper will block.
Also pause if your goal requires nearly invisible side light: a blackout-labeled paper panel cannot, by itself, prove a light-tight perimeter.
Product 2: LazBlinds No Drill Premium Custom Blackout Cellular Shades
The buyer job: an everyday made-to-measure inside-mounted shade
The locked LazBlinds product is a custom blackout cellular shade using a no-drill inside tension-fit arrangement. Unlike the four-pack of adhesive paper, it is ordered to the window's dimensions and designed as a recurring-use, cordless window shade. The manufacturer lists a configurable width range of 16 to 51 inches and height range of 12 to 72 inches, with a minimum frame depth of 1.5 inches for this selected model. [6]
This role is relevant when an appropriate frame recess exists and the buyer wants a finished window-covering system rather than a temporary paper layer. It is not automatically appropriate for shallow casings, unusually irregular openings, weak trim, or rentals that restrict pressure-fit installations.
Measure for the factory, not for a DIY trim
LazBlinds instructs buyers to measure the inside opening at three widths and three heights, and to submit their exact measured dimensions without applying homemade clearance deductions. The factory's sizing method accounts for adjustments on its side of the order. Copying a measuring allowance from a different window-blind brand can make a custom fit less reliable, not more. [6]
The manufacturer also states production tolerances of approximately plus or minus 1/8 inch in width and 0 to +2 inches in height for this custom range. Those are the maker's stated tolerances, not something this guide can promise for every individual order. Consider them when checking the installation location and bottom clearance. [6]
Do not order solely from the dimension printed on a window package. Measure the installed opening, including the available depth where the tension headrail would actually sit, and note any frame unevenness that could affect stable contact.
Depth and contact are essential even with a no-drill mechanism
For the selected LazBlinds shade, 1.5 inches is the published minimum frame depth, not evidence that the mechanism works on every narrow ledge, rounded molding, slick finish, fragile surface, or sloped recess. The flat contact geometry, material, and condition of the frame remain buyer-specific checks.
The manufacturer describes a no-drill tension mechanism and includes fitting instructions. Follow the exact model's guidance for adjusting and securing it; do not assume that ordinary pressure alone, a generic spring rod, or a substitution from another LazBlinds line has the same geometry or capacity.
After installation, test how the cordless shade moves and whether its headrail or the stack of cellular fabric interferes with a sash, latch, handle, or opening path. No hole in the frame is not the same as no interference with the window.
Custom return limits make the measurement gate financial
The manufacturer explains that its custom, made-to-measure items are generally not returnable unless they arrive defective or damaged. This is materially different from assuming an off-the-shelf purchase can be returned because it does not fit the opening as expected. Review the exact order policy and any retailer or manufacturer terms that apply to your transaction before checkout. [6]
That makes the order of operations especially important: verify the frame depth, measure at multiple points, check window function, confirm the dimensions and configuration, and resolve unanswered fit questions before authorizing fabrication. The adopted evidence does not include a completed checkout test or a universal current delivery or availability guarantee.
When to hold the LazBlinds purchase
Pause if the usable width or height lies outside the selected published range, if you cannot confirm at least 1.5 inches of applicable frame depth, or if the proposed contact points are irregular or weak. Pause if you do not understand the manufacturer's exact measuring instructions or cannot tolerate the stated size variation.
Pause if you need a guaranteed zero-leakage perimeter, if the window must open through the installed headrail, or if a custom non-returnable item would be financially difficult to absorb after a fit mistake. No seller marketing phrase removes these checks.
Non-Ranked Comparison: Two Different Installation Architectures
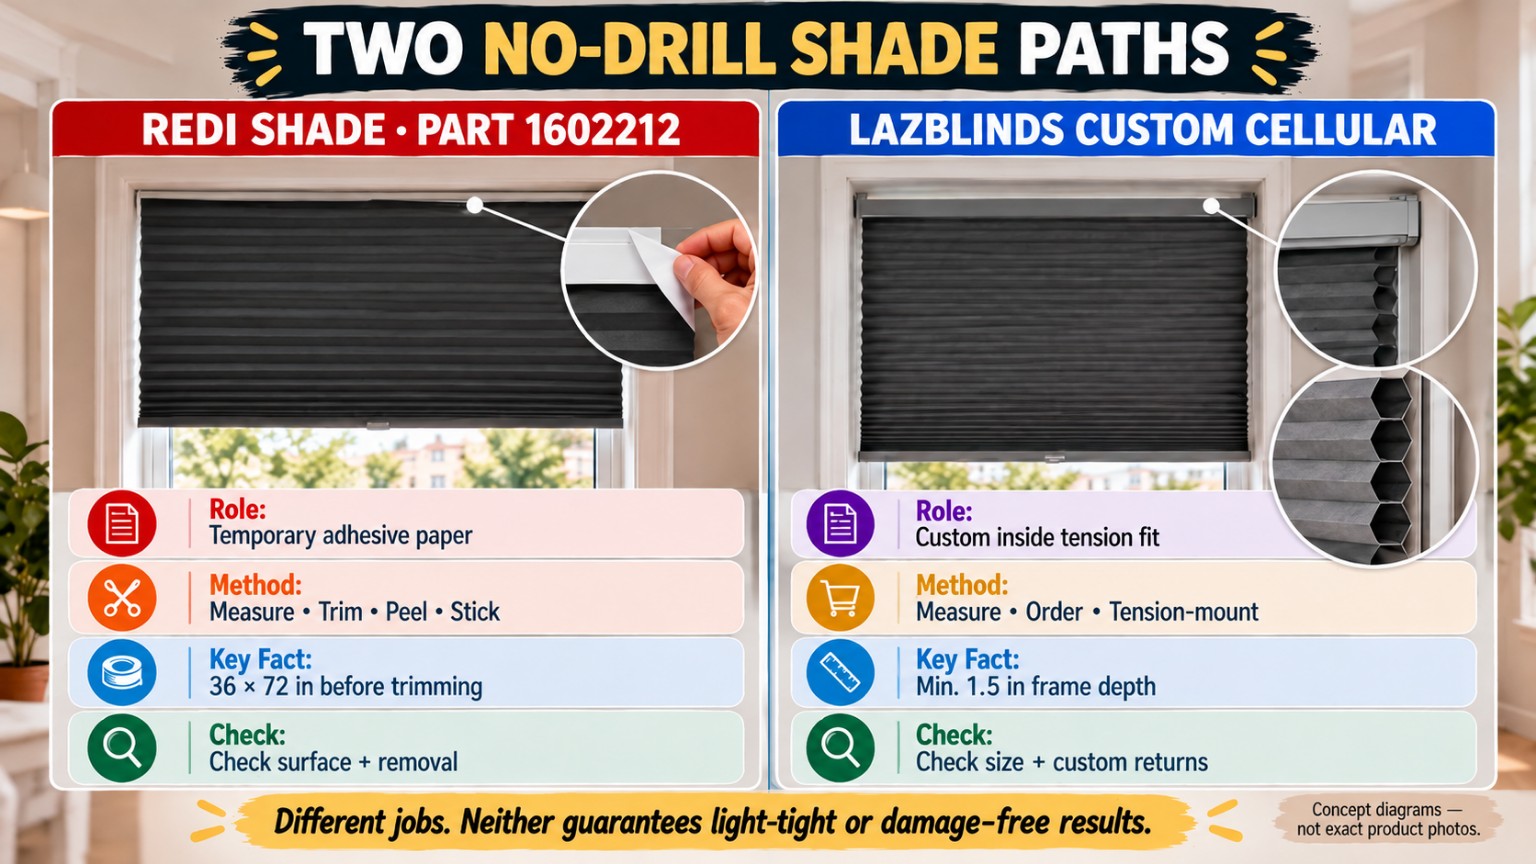
Mounting method
Redi Shade: trim-to-fit pleated paper with pre-applied adhesive on a maker-approved contact surface. A clean, dry, flat, compatible installation location is essential. [1] [3]
LazBlinds: custom-sized cellular shade held by a no-drill inside-mount tension system. The opening's dimensions, frame depth, and contact geometry are essential. [6]
Fit inputs
Redi Shade: measure the intended adhesive location, cut the locked 36-inch-wide paper shade to a suitable width, and check whether the 72-inch pre-trim length meets the coverage job. Trimming is not reversible.
LazBlinds: order within the locked width range of 16–51 inches and height range of 12–72 inches, using the maker's multi-point measurement and exact-dimension instructions. The frame depth requirement is 1.5 inches minimum and factory tolerances still apply. [6]
Everyday operation
Redi Shade: cordless pleated paper adjusted with included clips; a simple temporary-coverage workflow that depends on the adhesive staying attached. [1]
LazBlinds: cordless free-stop cellular shade intended for regular raising and lowering; a more permanent everyday-use workflow that depends on a suitable tension fit. [6]
Light-control expectation
Redi Shade: maker advertises up to 99% light blocking for the blackout shade material. That is not a measurement of all light entering your room. [1]
LazBlinds: manufacturer markets the custom cellular material as blackout. Its fabric designation does not verify the side, top, or bottom light gaps at your specific window. [6]
Removal and re-use
Redi Shade: the maker supplies a removal method and acknowledges possible adhesive residue; the adhesive is designed for one-time placement, not reliably repeated resticking. [3] [5]
LazBlinds: no-drill tension mounting avoids traditional screw holes but still requires careful removal and a finish-compatible contact surface. The exact post-removal surface condition is not guaranteed for every frame.
Purchase and return exposure
Redi Shade: a four-piece temporary format whose effective cost depends on how many windows it actually fits, cutting waste, surface compatibility, and the seller's applicable return policy.
LazBlinds: a custom manufactured shade whose final price depends on configuration, size, and order terms; the maker states a restrictive policy for made-to-measure returns. Neither stock nor final checkout terms are guaranteed by this guide. [6]
There is no overall winner. The two products are not the same underlying installation system, and a better specification on one dimension cannot substitute for a missing contact surface or a prohibited mounting method.
Blackout Material Is Not a Light-Sealed Window
Blackout is often used as a fabric or shade material claim. But daylight can enter at the edges regardless of what happens when light strikes the center of the panel. Look for gaps at the headrail, where the shade meets the side casing, and where the lower edge rests near the sill.
A temporary adhesive shade can be cut to span a location yet still expose light through irregular side boundaries. A custom inside-mounted cellular shade can be made to the opening's measured dimensions and still leave a visible perimeter seam. The manufacturer's published light-blocking language should not be turned into a claim of total darkness without testing the complete installed system.
If the bedroom needs to become notably darker, first identify whether the dominant problem is light passing through the existing covering or light bypassing around it. The two problems are not identical. If your threshold is “no visible glow,” the required outcome is unverified for both locked products. Do not buy either product on that promise alone.
There may also be daylight from a second window, a door transom, a skylight, or light entering under a door. A window shade should not be judged as a whole-room light isolation system unless the other paths are controlled.
Renter Rules, Surface Risk, and Removal Planning
Before installation, determine what your agreement allows. Some rentals prohibit drilling but say little about adhesive on finished trim; others have restrictions concerning any alteration, window hardware, cleaning agents, or treatment of painted surfaces. A product's no-drill label is not a substitute for permission where a building or lease requires it.
For Redi Shade, inspect the adhesion point as carefully as the dimension. The manufacturer's FAQ does not endorse every wall or casing finish. If a suitable area cannot be established, stop. If the landlord requires the window treatment to be removed at move-out, account for residue and the possibility that cleaning a delicate finish could itself cause damage. [3] [5]
For LazBlinds, verify that the inside frame is an acceptable place to apply the tension system and that the contact will not interfere with hardware or damage vulnerable trim. The absence of screw holes can reduce one form of alteration without proving that all pressure contact is harmless. Do not tighten or adjust the system beyond the manufacturer's instructions.
A basic handover plan is useful: document the existing finish, keep the manufacturer's instructions, preserve the purchase and return information, and understand what removal will require. The aim is not to guarantee an unmarked window; it is to avoid promising something the materials cannot establish.
Cost, Waste, and Returns: Compare the Whole Window Job
An advertised unit price does not measure cost per successful window. Redi Shade's four-pack may cover more than one compatible opening, but a single window that is too wide, a surface that rejects adhesive, or an irreversible cutting error can reduce the value. The temporary format may also be a poor economic fit when the shade must be removed and reinstalled repeatedly.
LazBlinds has a different cost structure. It is customized for each window, so the amount, order options, and final configuration matter. Custom manufacture can make a poor measurement costly because the maker restricts non-defect returns. The actual total price and final checkout condition remain dependent on a live seller transaction. [6]
Compare the practical cost of the actual use case: one bedroom window, two windows, a temporary move-in, a lease lasting several years, or a room that needs the shade operated daily. The number of openings, the permitted mounting technique, and expected removal are more decision-relevant than a broad “cheap versus premium” label.
Keep shipping estimates, stock, promotions, and return policies separate from technical specifications. An accessible product page does not establish that the exact size and finish you need will ship to your address at a specific price or on a specific date.
Child-Safety and Window-Use Boundaries
The U.S. Consumer Product Safety Commission advises using cordless window coverings where young children are present due to serious strangulation hazards associated with accessible window cords. The locked Redi Shade Original shade is described as cordless and clip-operated; the locked LazBlinds custom cellular shade is described as cordless. Both maker descriptions are helpful attributes but not independent proof of a universally child-safe room. [1] [6] [7]
Check the manufacturer's current installation instructions, the security of the mounted covering, the accessibility of small parts or clips, and any existing cords on neighboring coverings. Move furniture and children's sleeping or play areas away from hazardous window coverings as advised by CPSC. Do not replace product-specific safety instructions with broad marketing language.
Also make sure the shade does not prevent a window from closing securely, operating ventilation where needed, or opening for emergency use. If the selected position compromises those functions, the installation location is unsuitable regardless of how well the shade blocks light.
A Practical Setup and Move-Out Workflow
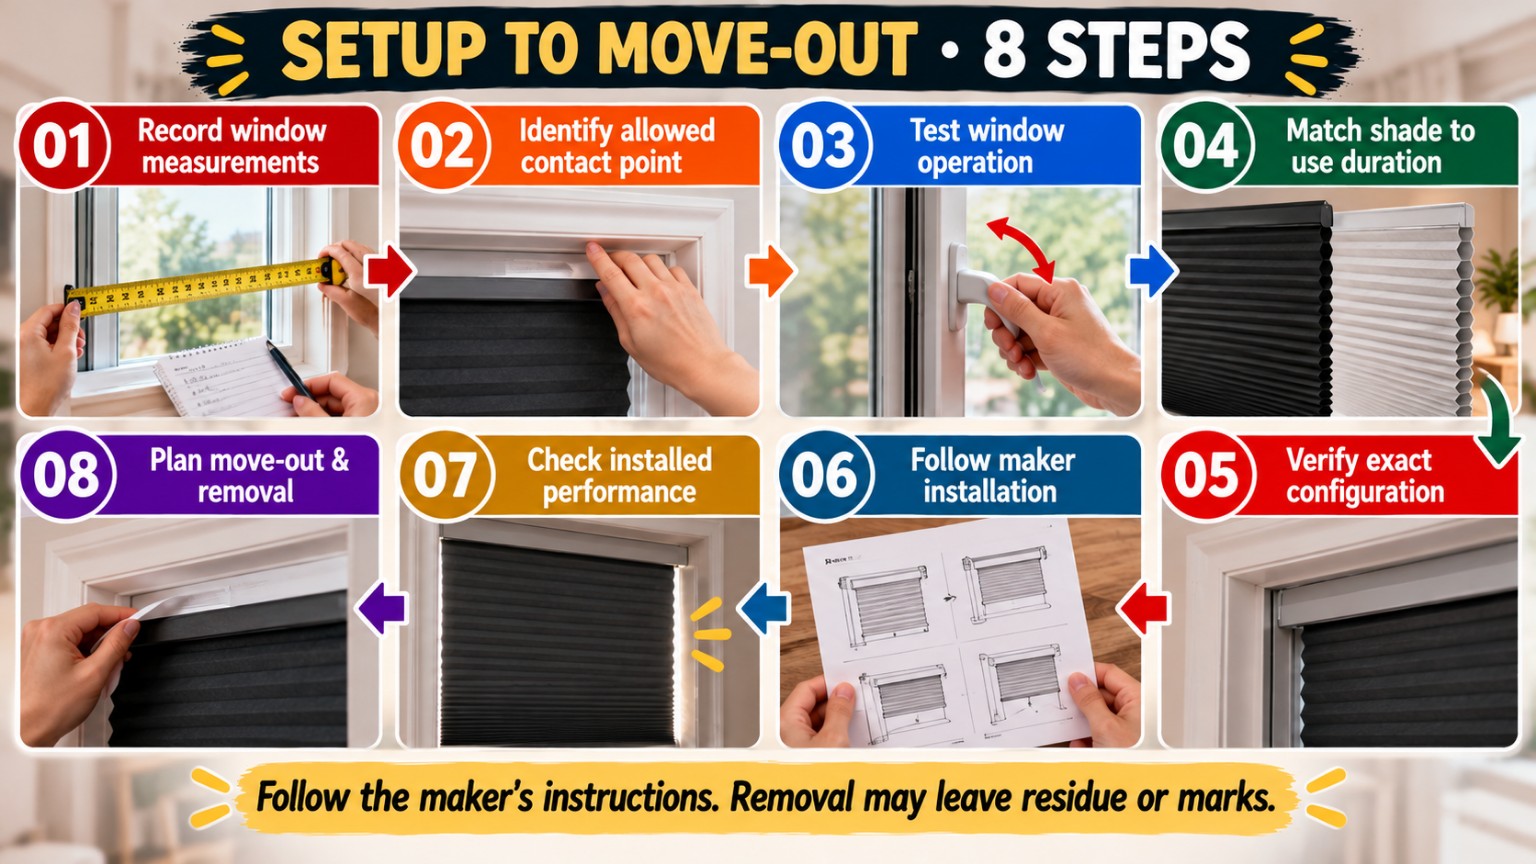
Step 1: Record the actual window
Write down three widths and three heights. Record the frame depth for an inside-mounted tension system, and photograph unusual molding, latches, or uneven surfaces. Label the measurements by window rather than guessing later which room they describe.
Step 2: Identify the allowed contact point
Mark the exact adhesive landing area or tension-headrail contact location. Compare it with the manufacturer's limitations and the rental agreement. If either source disallows the location or leaves a material compatibility question unresolved, pause.
Step 3: Test the operating window
Open and close the sash or door through its normal range, including locks and cranks. Visualize where a raised stack, lowered paper, clips, or tension rail will sit. Do this before ordering a custom shade or trimming an adhesive one.
Step 4: Match the product to the use duration
Decide whether you need a temporary coverage layer or an everyday custom shade. Avoid buying four temporary pieces just because they appear inexpensive if you actually need a repeatedly repositioned installation. Avoid custom manufacture if the window is unsuitable or permission is unclear.
Step 5: Verify the exact product configuration
For Redi Shade, confirm Black Four-Pack, part 1602212, 36-by-72-inch pre-trim configuration, and installation supplies. For LazBlinds, confirm the exact premium custom blackout cellular model, selected dimensions, color, mounting arrangement, and return terms. Do not mix sizes or details from a similarly named model. [1] [2] [6]
Step 6: Install strictly to the maker's instructions
For adhesive paper, prepare the surface and allow the supplied adhesive to set as directed. For the custom tension shade, follow the exact adjustment procedure and verify that the frame remains stable. Do not substitute extra tape, screws, or improvised hardware to force a failed fit.
Step 7: Check performance under normal use
Lower and raise the shade as intended. Watch for slippage, frame pressure, catching, uneven hanging, obstructed locks, and edge light. If it moves or the window cannot function properly, stop and follow the manufacturer's troubleshooting instructions rather than increasing force without guidance.
Step 8: Plan the exit before the exit
Keep the cleaning and removal instructions where you can find them. Redi Shade Original adhesive is one-use and may leave residue; the maker has a specific gentle removal sequence. A tension assembly should be released only as directed. Verify finish compatibility before attempting any cleaning agent. [3] [5] [6]
Common Buying Mistakes
Treating all no-drill shades as the same mechanism
Peel-and-stick paper and tension-mounted custom cellular fabric do not rely on the same surfaces. Choosing from the words “no drill” alone skips the most important technical difference.
Buying from a single width measurement
The top of a frame can be different from the middle or bottom. A custom order must follow its own maker's measuring method; a trim-to-fit paper shade needs the intended adhesion area measured before cutting.
Treating a nominal recess as usable depth
A thick-looking frame may have only a narrow flat strip where the tension mechanism would go. The specific LazBlinds product states a 1.5-inch minimum, but actual contact geometry still has to work.
Assuming blackout means no edge leakage
Light can travel around the shade. Neither maker's material claim is a verified complete-room darkness result.
Assuming peel-and-stick means reusable
Redi Shade says its adhesive is intended for one-time placement. Removal instructions exist, but repeated adhesion and completely damage-free removal are not guaranteed.
Ordering custom before checking returns
The LazBlinds manufacturer's custom-return restriction makes an unresolved measurement or frame-depth question a real financial risk.
Forgetting that windows are moving equipment
Handles, latches, tilt sashes, opening paths, screens, ventilation, and emergency access all need to remain usable. If a shade blocks them, nominal width compatibility is not enough.
Relying on broad safety or stock claims
Cordless is important, but do not generalize that any installation is child-proof. Likewise, neither a manufacturer listing nor a retailer page proves current inventory, delivery, or final checkout for every location.
Frequently Asked Questions
Will no-drill blackout shades work on every rental window?
No. Redi Shade needs a manufacturer-compatible adhesive surface and suitable coverage dimensions; LazBlinds needs an acceptable inside frame with at least the stated product-specific depth and an opening within its custom size range. Lease rules, finish sensitivity, and window operation can stop either installation. [1] [3] [6]
Can I use the Redi Shade four-pack on a window larger than 36 inches?
The locked part is a 36-inch-wide shade before trimming. The manufacturer describes the possibility of overlapping shades for larger window coverage, but that does not prove the resulting seam will block all light or that the new adhesive positions will be suitable. Confirm the exact layout and maker instructions rather than assuming one continuous, gap-free covering. [1]
Can I move a Redi Shade Original shade to another apartment?
The manufacturer states that the Original Simple Stick adhesive is designed for one application and does not guarantee reattachment. It offers removal guidance, not a promise of reusable mounting. Treat a repeated-move plan as unsupported unless the maker confirms a suitable method. [3] [5]
Does the LazBlinds 1.5-inch minimum guarantee my recess will fit?
No. It is the published minimum for the locked product, not a universal promise for every frame material, uneven casing, protrusion, or contact geometry. Verify the specific headrail location and exact current installation requirements before ordering. [6]
Do I subtract a fitting allowance from my measured width?
Do not invent a deduction. LazBlinds explicitly instructs customers to submit their exact window dimensions without making their own adjustments; the maker applies its production method. Redi Shade follows an entirely different measure-and-trim installation workflow. [4] [6]
Can blackout fabric guarantee a room with no sunlight at all?
No. Fabric or material blocking claims do not measure light entering around the perimeter. If even a narrow glow at the edge is unacceptable, neither locked product offers a verified whole-room zero-light guarantee in the adopted evidence.
Are these products guaranteed not to mark paint or trim?
No. Redi Shade warns against certain mounting surfaces and acknowledges that adhesive residue is possible. A no-drill tension system also contacts the frame and must be assessed for finish and structural suitability. Do not promise damage-free removal. [3] [5] [6]
What if I order the wrong LazBlinds size?
Review the specific order and return terms before purchasing. LazBlinds says custom made-to-measure products are generally not returnable unless defective or damaged. That is why the three-point measuring, frame-depth, and clearance checks belong before checkout. [6]
Are cordless shades enough to make the window safe for children?
Cordless coverings are recommended by CPSC to address window-cord strangulation hazards, but the whole installation still needs the appropriate manufacturer instructions and attention to mounting security, loose components, and surrounding furniture. Do not treat cordless as a universal child-safety certification. [7]
Final Pre-Purchase Checklist
- I have measured the usable opening at three widths and three heights, rather than relying on a nominal window size.
- I know which surface or frame will carry the shade, and the selected manufacturer allows that contact arrangement.
- For LazBlinds, I have verified the actual inside-frame depth, with at least the maker's stated 1.5-inch minimum for this model.
- I have checked the window's opening, closing, locking, ventilation, and clearance path with the intended shade location in mind.
- I understand that blackout material can still allow light around the edges, and I know what level of leakage I can accept.
- I have checked the lease or building restrictions and considered possible residue, scuffs, or other removal consequences.
- I have reviewed the product-specific method of operation and any child-safety or room-access risks.
- I know whether I am buying a temporary four-pack that needs cutting or a custom shade with restrictive made-to-measure returns.
- I have confirmed the exact product identity and current seller terms, rather than assuming stock or checkout from an older listing.
If one of these checks fails, do not force either product into a role it was not designed to fill. If a critical product or window fact remains unknown, keep the decision open until it is verified.
Bottom Line: Start With the Window, Not the Blackout Label
A Redi Shade Original Paper Blackout Four-Pack (part 1602212) is a temporary adhesive-paper solution for appropriate surfaces and openings within its trimmable format. A LazBlinds No Drill Premium Custom Blackout Cellular Shade is a made-to-measure, inside-tension system for frames that meet its size, depth, and installation requirements.
The better question is not which product is universally best. It is which installation architecture actually fits your window, lease, everyday use, removal expectations, and tolerance for edge light. Measure those conditions first. Then verify the exact maker instructions and the current buying terms before committing.
Product Sources and Safety References
[1] Redi Shade — Original Paper Blackout Shades, Black Four-Pack. First-party product identity, 36-by-72-inch selectable configuration, trim/peel/stick installation, cordless operation and manufacturer light-control claim:
https://redishade.com/products/original-paper-blackout-shades-black-4-pack
[2] HD Supply — Redi Shade 36-inch by 72-inch Blackout Paper Shade, Black, Four-Pack. Exact U.S. retailer identity showing manufacturer part 1602212; this is not a promise of current price or stock:
[3] Redi Shade — Frequently Asked Questions. Manufacturer guidance on suitable mounting surfaces, Original paper cleaning, one-time Simple Stick adhesive and residue precautions:
https://redishade.com/pages/faq
[4] Redi Shade — How to Install Original Shades. First-party measurement, trimming, adhesive preparation and installation sequence:
https://redishade.com/blogs/faqs/how-to-install-original-shades
[5] Redi Shade — How to Remove Original Shades. First-party removal method, possible residue and one-time-use boundary:
https://redishade.com/blogs/faqs/faq-how-to-remove-original-shades
[6] LazBlinds — No Drill Premium Custom Blackout Cellular Shades. First-party exact product page, customizable 16–51-inch width and 12–72-inch height, minimum 1.5-inch depth, maker measurements, tolerances, inside tension mounting and custom return terms:
https://www.lazblinds.com/products/no-drill-premium-custom-blackout-cellular-shades
[7] U.S. Consumer Product Safety Commission — Window Covering Cords. Federal consumer safety guidance on choosing cordless window coverings where children are present:
https://www.cpsc.gov/gocordless
Specifications, finishes, prices, stock and checkout policies may change. This guide does not guarantee a particular surface fit, light-sealed room, damage-free installation, child-proof environment, or successful purchase at any seller.